

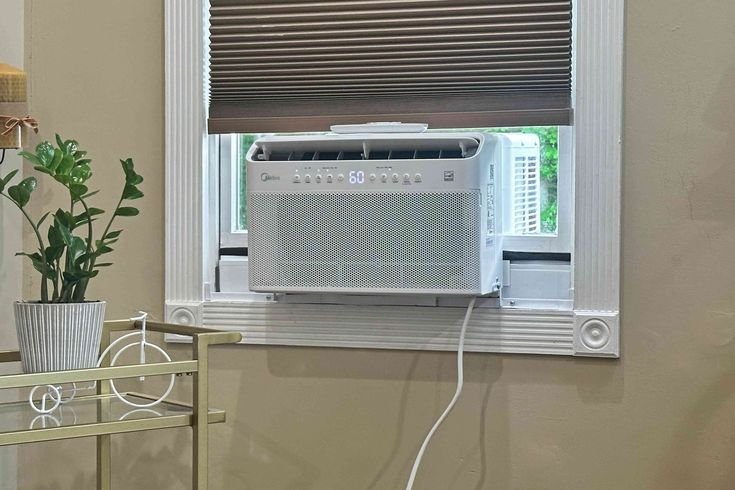
6 essential window AC setup steps for beginners
There’s a moment every summer when the heat stops feeling seasonal and starts feeling personal. The air hangs heavy, fans begin to feel like decoration rather than relief, and suddenly that window AC unit sitting in its box becomes the most important object in the room. If you’ve never installed one before, though, it can feel less like a solution and more like a puzzle with sharp edges and unclear instructions.
This guide walks you through six essential steps—not as a rigid checklist, but as a lived process. Think of it as a blend of instruction, observation, and practical wisdom gathered from small mistakes that are easy to avoid once you know where to look.
We’re not just aiming for a working AC. We’re aiming for a setup that cools efficiently, runs safely, and doesn’t leave you second-guessing every vibration or drip of water.
step one: understanding your window before touching the AC
Before lifting the AC out of its box, pause. The most common mistake beginners make is assuming all windows behave the same way. They don’t.
Spend a few minutes studying your window. Is it a sliding window or a double-hung window that moves vertically? Does the frame feel solid or slightly worn? Are there gaps around the edges even when it’s fully closed?
Run your hand along the sill. If it feels uneven, cracked, or dusty, that’s not just a cosmetic issue—it affects how securely your AC will sit. A slightly tilted or weak sill can lead to vibration, noise, or even the unit shifting over time.
Now measure. Not casually, but carefully. Width matters, but so does height. Many beginners focus only on whether the AC fits horizontally, forgetting that the top sash must come down and secure the unit in place.
A small notebook helps here. Write down:
- window width
- window height
- depth of the sill
- any visible gaps or irregularities
This step doesn’t feel exciting, but it’s where most successful installations quietly begin.
A short reflection
Think of your window as the foundation. You wouldn’t build a house without checking the ground first. Installing an AC without understanding the window is the same kind of shortcut—and it leads to the same kind of problems.
step two: preparing the space and the unit
Once you understand your window, the next step is preparation. Not installation—preparation.
Clear the area around the window. Move furniture, remove curtains, and create enough space to move freely. You’ll be holding a heavy object while trying to align it with precision. Clutter turns that into a risky balancing act.
Unbox the AC and resist the urge to rush. Lay out all the components. Most window AC units come with:
- side panels (accordion-style extensions)
- mounting brackets or rails
- screws and small hardware
- foam insulation strips
Check everything. Missing hardware is surprisingly common, and it’s better to discover it now than halfway through the process.
Now inspect the AC itself. Look for any visible damage from transport—dents, loose panels, or rattling sounds when gently tilted. If something feels off, it probably is.
Let the unit sit upright for at least 2–4 hours if it has been transported lying down. This allows the internal refrigerant to settle properly, which protects the compressor when you turn it on later.
A practical note
If you’ve ever rushed into a task thinking “I’ll figure it out as I go,” you already know how that usually ends. Preparation is not wasted time—it’s borrowed time from future frustration.
step three: installing the support system
This is where things start to feel real.
Most beginners underestimate the weight of a window AC. Even smaller units can weigh 20–30 kg (45–65 lbs), and larger ones go well beyond that. The window frame alone is not meant to carry all that weight without support.
If your unit includes mounting brackets, use them. If it doesn’t, consider adding an external support bracket. It sits under the AC on the outside of the window, taking much of the load off the frame.
Position the bracket so that it slightly tilts outward. This isn’t a flaw—it’s intentional. Window AC units need a slight downward tilt toward the outside to allow condensation to drain properly.
Inside the room, attach any top mounting rails to the AC. These rails help secure the unit against the window sash.
Now comes a moment that often feels awkward: lifting the AC into place.
If possible, get help. Even if you think you can manage alone, a second pair of hands makes alignment much easier and safer.
Lift the unit carefully and place it onto the window sill or bracket. Slide it back until the mounting rail rests against the window frame.
Lower the window sash gently onto the top of the unit. It should press firmly but not forcefully.
Pause here.
Before tightening anything, step back and look at the setup. Is the unit centered? Does it feel stable? Is there a slight tilt outward?
Adjust now. Small corrections at this stage prevent larger problems later.
A quiet warning
If the AC feels unstable, don’t convince yourself it will “probably be fine.” Instability tends to get worse with vibration, not better.
step four: sealing the gaps properly
At this point, the AC is in place—but it’s not yet efficient.
Look at the sides of the unit. Those accordion panels you set aside earlier? Now they come into play. Extend them to fill the gaps between the AC and the window frame.
Secure them with screws if required.
But here’s the detail many beginners miss: those panels alone are not enough to seal the space.
Air will find its way through even small openings. And when it does, your AC works harder, your room cools slower, and your electricity bill quietly climbs.
Use foam insulation strips to seal:
- the gap between the top sash and the lower sash
- any visible openings along the sides
- small cracks where air might leak
Press the foam firmly but don’t compress it too much—it needs to maintain its shape to block airflow effectively.
Now check for light. Turn off the room lights and look around the unit. If you see daylight coming through, that’s where air is entering too.
Seal those spots.
A small exercise
Stand near the AC and place your hand around the edges while it’s running later. If you feel warm air, that’s a leak. Fixing it often takes minutes but improves performance noticeably.
step five: securing and stabilizing the unit
With the gaps sealed, it’s time to lock everything into place.
Use the screws provided to secure the AC to the window frame. This step prevents shifting, especially during strong winds or prolonged use.
If your unit includes L-shaped brackets, attach them at the top to hold the window sash firmly against the AC. This adds an extra layer of stability.
Now gently push and pull the unit. It shouldn’t move. A slight vibration is normal, but any noticeable shifting is not.
Check the tilt again. The back of the unit should be slightly lower than the front. Not dramatically—just enough for water to drain outward.
Take a moment to observe the outside portion if possible. Make sure nothing is obstructing airflow. The back of the AC needs space to release heat.
Remove any packaging materials or protective covers that might still be attached.
A moment of patience
It’s tempting to rush to the final step and turn the AC on immediately. But giving yourself a few extra minutes to double-check stability can prevent hours of troubleshooting later.
step six: powering up and testing performance
Now comes the part everyone looks forward to.
Plug the AC directly into a wall outlet. Avoid using extension cords if possible—they can overheat and reduce efficiency.
Turn the unit on and listen.
The initial startup sound may feel louder than expected, especially if you’ve never used a window AC before. That’s normal. What you’re listening for is consistency.
A steady hum is good. Irregular rattling or grinding is not.
Let the unit run for 10–15 minutes. Then check:
- Is cool air coming out steadily?
- Is the airflow strong?
- Are there unusual noises?
- Is water dripping outside (a good sign of proper drainage)?
Walk around the room. Notice how the temperature changes. A well-installed AC doesn’t just blow cold air—it gradually transforms the entire space.
Adjust the settings. Experiment with fan speed and temperature. Find what feels comfortable rather than just cold.
A final check
After an hour of use, revisit the installation. Touch the frame, check for vibrations, and ensure nothing has shifted.
Sometimes small adjustments reveal themselves only after the unit has been running.
closing thoughts
Installing a window AC for the first time is less about technical skill and more about attention. Each step builds on the previous one, and skipping even a small detail can affect the final result.
But when done right, the reward is immediate and tangible. The room cools evenly, the unit runs quietly, and the heat outside feels just a little less overwhelming.
There’s also a quiet confidence that comes from doing it yourself. Not perfectly, perhaps—but thoughtfully.
And that’s more than enough.
frequently asked questions
- how long does it take to install a window AC for the first time?
For beginners, it usually takes 1.5 to 3 hours. This includes preparation, careful positioning, and sealing. With experience, the process becomes much faster, often under an hour. - can I install a window AC without a support bracket?
Technically yes, especially for smaller units. However, using a support bracket is strongly recommended for safety and stability. It reduces stress on the window frame and prevents long-term issues. - why is my window AC making a rattling noise?
Rattling usually indicates instability or loose components. Check if the unit is securely fastened, ensure the window sash is tight, and confirm that no parts are vibrating against each other. - should the AC be completely level?
No. A slight tilt toward the outside is necessary for proper drainage. A completely level unit can cause water to collect inside, leading to leaks or reduced efficiency. - how do I know if my AC is sealed properly?
Look for visible gaps and feel for air leaks around the edges while the unit is running. If you notice warm air entering, add more insulation to those areas. - is it safe to run a window AC all day?
Yes, as long as it is installed correctly and plugged into a proper outlet. Ensure good airflow around the unit and clean the filter regularly to maintain efficiency and safety.