

Meta Description: 4 Simple Window AC Cleaning & Maintenance Guide changes that worked instantly — discover the quick fixes that boost cooling, cut energy bills, and extend your unit’s life.
4 Changes to Window AC Cleaning & Maintenance Guide That Work for a Little While
Immediate Fixes: 4 Guide Cleaning & Maintenance Window AC
If your window AC is blowing warm air, smelling musty, or running round the clock without really cooling down your room — you’re not alone. Most people forget about their window AC unit until it goes wrong. But here’s the thing: most of these issues can be remedied with some cleaning and basic maintenance in short order.
This guide lists 4 simple changes you can make for window AC cleaning and maintenance which really work, with immediate results. No expensive technician. No special tools. Just steps everyone can take that are practical.
Let’s get into it.
Why Window AC Maintenance Is an Afterthought (And Why That’s a Mistake)
Most homeowners give little thought to their AC until summer strikes in full force. By that time, the unit is dusty, the filter is clogged, and the coils are dirty. The air conditioner is running but the room still does not feel cool, the electric bill has shot up, and it feels like a lost cause.
Here’s what neglect really costs you:
| Problem Caused by Neglect | Result |
|---|---|
| Dirty air filter | Poor airflow, warm air output |
| Dirty evaporator coils | Reduced cooling efficiency |
| Clogged drain pan | Water leaks, mold growth |
| Bent or dusty condenser fins | Higher energy use |
These aren’t small inconveniences. A dirty window AC can consume as much as 15% more electric power than a clean one. That adds up quickly over the summer.
The good news? Each of the four tweaks below takes under an hour. Some take under 15 minutes. And you can feel the difference right away.
What You Should Know Before Getting Started
Before going through the steps, you’ll want to have these simple supplies:
- A screwdriver (flathead and Phillips)
- Soft brush or old toothbrush
- Vacuum with a brush attachment
- Warm water and mild dish soap
- Spray bottle
- White vinegar
- A fin comb (optional but good to have)
- Clean towels or rags
- Protective gloves
Before you do anything, make sure that your AC is unplugged. Safety first — no exceptions.
Change #1 — Replace or Deep-Clean Your Air Filter (The One Fix That Changes Everything)
This is the most effective thing you can do for your window AC. But most people don’t do it for months, even years.
Why This Filter Matters So Much
The air filter is the first line of defense for your AC. It captures dust, pet hair, pollen, and other particles before they enter the unit. When it is clogged, air cannot pass through as it should.
What happens then?
- The AC has to exert much more effort for sucking air
- Cooling drops noticeably
- Energy consumption spikes
- The motor wears out faster
A clogged filter isn’t just a performance killer — it’s slowly killing your unit over time.
How to Clean or Replace the Filter
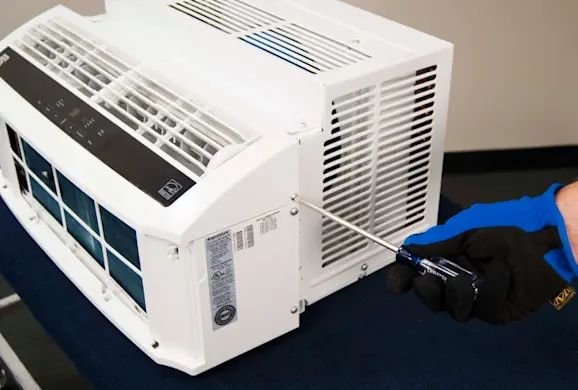
Step 1: Unplug the AC from the wall.
Step 2: Take off the front panel. On most units, it can be snapped off or is held in place by two small screws on the sides.
Step 3: Slide out the filter. It typically lives just behind the front grille.
Step 4: Shine light through the filter. If you can’t see through it, it needs to be cleaned or replaced.
Step 5 (Cleaning): Rinse the filter under warm running water. Use a soft brush to remove dusty residues that are stuck on. If there’s grease or heavy soiling, add a drop of dish soap.
Step 6: Allow the filter to dry completely prior to placing it back. A wet filter can cause mold.
Step 7 (Replacing): If the filter is torn, warped, or doesn’t come clean, replace it. Window AC filters typically cost between $5 and $15 and are very easy to find at hardware stores.
How Often Should You Do This?
| Usage Level | Cleaning Frequency |
|---|---|
| Light use (evenings only) | Every 4–6 weeks |
| Moderate use (daily, 6–8 hrs) | Every 2–3 weeks |
| Heavy use (all day, humid area) | Every 1–2 weeks |
Quick fix: Improved airflow within minutes of putting in a clean filter. Rooms chill quickly and the AC is less noisy.
Change #2 — Clean the Evaporator and Condenser Coils (Cooling Actually Happens Here)
Most people have never touched their AC coils. That’s a problem. Dirty coils are one of the leading causes window ACs lose their ability to cool over time.
What Are the Coils?
Your window AC unit has two sets of coils:
Evaporator coils are on the inside (room-facing side). They absorb heat from indoor air and cool it down.
Condenser coils are located outside. They release that heat outdoors.
Both collect dust, dirt, and debris as time passes. When coated, they become poor conductors of heat. Even running full blast, the AC won’t cool properly.
Signs Your Coils Are Dirty
- It takes way longer to cool the room
- AC runs non-stop but is unable to cool to the set temperature
- Ice forms on the coils (definitely a red flag)
- Unusual hissing or bubbling noises from the unit
Steps in Cleaning the Coils
Step 1: Unplug the AC unit and remove it from the window. You will probably need someone else to help with this.
Step 2: Unscrew the back panel and remove the outer casing. Check your unit’s manual if necessary.
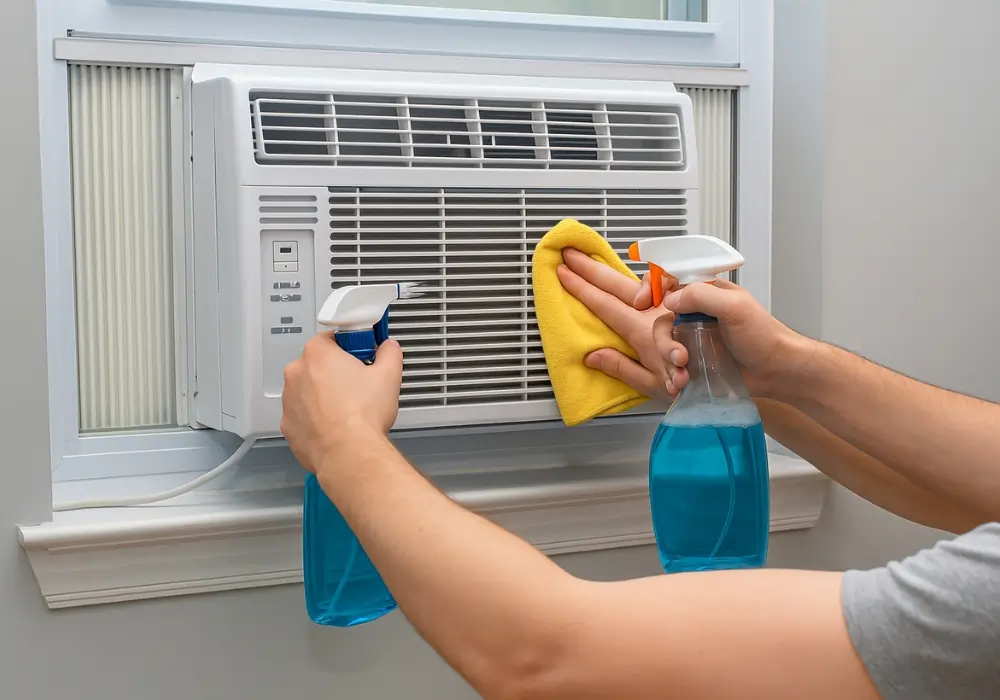
Step 3: Wipe off any loose dust on both sets of coils with a soft brush or by vacuuming them using a brush attachment.
Step 4: Pour equal parts white vinegar and warm water into a spray bottle.
Step 5: Lightly spray the coils. Let it sit for 5 minutes. Vinegar dissolves grime and kills mold spores.
Step 6: Gently wipe with a clean soft cloth. Don’t scrub too hard — the fins are fragile and bend easily.
Step 7: For built-up crud, a commercial AC coil cleaner spray (usually found at hardware stores) would do the trick. Follow the label instructions.
Step 8: Let everything thoroughly dry before reassembling and reinstalling.
The Fin Factor
Your coils have thin metal fins that can bend, which restricts airflow even more. A fin comb (approximately $5–$10) can straighten them out. Run it carefully along the fins, following the direction in which they are bent.
Quick fix: Significantly cooler air output after the first use post-coil cleaning. Plenty of users report that the AC finally reached the desired temperature for the first time in months.
Change #3 — Clean the Drain Pan and Drain Line (Stop That Moldy Smell Once and for All)
If your window AC smells like a damp basement, here’s why. The drain pan collects condensation water — moisture that your AC sucks out of the air while cooling. When that pan becomes dirty or the drain line gets clogged, stagnant water settles in the unit.
Standing water = mold and mildew buildup.
That musty odor isn’t just nasty. It’s actually mold spores blowing into your room every time the AC operates.
Finding the Drain Pan
The drain pan is located at the bottom of your AC unit, directly underneath the evaporator coils. It’s meant to gather water that drips off the coils and direct it out through a drain hole or drain line to the exterior.
How to Clean the Drain Pan
Step 1: Unplug and take the AC unit out of the window.
Step 2: Tilt the unit back slightly (toward the outside) to allow any residual water to run out before opening.
Step 3: Remove the casing and look to the bottom of the unit to find the drain pan.
Step 4: Use a wet/dry vacuum or towels to remove standing water in the pan.
Step 5: Mix a solution of 1 cup white vinegar and 1 cup warm water.
Step 6: Pour the solution into the drain pan. Let it sit for 10 minutes. This kills mold and bacteria.
Step 7: Using a stiff brush or an old toothbrush, scrub the inside of the pan. Be mindful of areas where slime accumulates, like corners.
Step 8: Flush with clean water. Make sure that the drain hole at the back is clear and not blocked.
Step 9: If there’s a clogged drain line, feed a thin wire or pipe cleaner into the drain to clear the obstruction.
Preventing Future Buildup
After cleaning, place two or three drain pan tablets into the pan. They’re cheap (about $8 for a pack) and dissolve slowly over the course of weeks, preventing algae and mold from building up in the pan.
You can also add a small amount of undiluted white vinegar into the pan every month as a preventive measure.
A Quick Mold Prevention Chart
| Action | Frequency | Cost |
|---|---|---|
| Clean drain pan | Every 30–60 days | Free (DIY) |
| Use drain pan tablets | Every 60–90 days | ~$8/pack |
| Pour vinegar in pan | Monthly | Pennies |
| Check drain line for clogs | Every season | Free |
Quick fix: The musty odor vanishes shortly after the drain pan is cleaned. The air is fresh and clean from the very first use.
Change #4 — Check the Seals and Window Fit (The Secret Energy Waster)
This is one that most people totally miss. It has nothing to do with the inside of the AC at all — it’s about how well it fits in your window.
A clean AC unit will still give you trouble if it’s badly sealed. Cracks around the unit allow cool air to vent outside and hot, humid air to seep back in. Your air conditioner is, in effect, battling itself to cool a space that’s being invaded by heat from outside.
For more detailed tips on keeping your unit in top shape all year long, check out Window AC Maintenance — a great resource for seasonal care guides and troubleshooting advice.
Signs Your Window Seal Is Failing
- Even on a moderate day, your room doesn’t feel as cool as it should
- You can feel warm air around the edges of the AC unit
- Your electricity bill is higher than expected
- Insects or dust appear to come inside from around the unit
How to Check and Repair the Seal
Step 1: Turn on the AC, then slowly hold your hand around the edges of the unit — top, bottom, and both sides. Feel for warm air leaking in.
Step 2: Inspect the foam side panels (the accordion-type ones that fill in the gaps on both sides of the unit). These deteriorate, crack, or compress over time.
Step 3: Examine the foam weatherstripping that runs along the window frame around the unit. If it looks compressed or missing, replace it.
Step 4: If the side panels are damaged, you can purchase universal replacement foam panel kits for about $10–$20 at hardware stores.
Step 5: For small gaps between the unit and window frame, fill with foam weatherstrip tape. Apply it cleanly and press down hard.
Step 6: For wider gaps or old windows with irregular shapes, foam rope caulk (also known as rope caulk or draft snake) does the trick. It is removable, so it can be taken out at the end of the season.
The Window Tilt Check
Most people don’t know this: a window AC should tilt just very slightly backward (toward the outside). This allows condensation water to flow out naturally instead of collecting inside or dripping into your room.
Most units only require a 1/4 to 1/2 inch tilt toward the outside. Use a level to check this. If necessary, place a thin shim under the front legs of the unit to adjust.
According to the U.S. Department of Energy, proper installation and sealing of window AC units can meaningfully reduce energy waste and improve overall cooling performance.
Immediate result: Rooms are cooler, the AC cycles off more frequently (meaning it’s actually hitting the temperature setting), and energy use declines noticeably.
How These Four Changes Support Each Other
Each fix helps on its own. But combined, they make a big difference. Here’s a brief summary of what each change does:
| Change | What It Fixes | Time Needed |
|---|---|---|
| Clean/replace the air filter | Poor airflow, warm output | 10–15 minutes |
| Clean the coils | Reduced cooling power | 30–45 minutes |
| Clean the drain pan & line | Musty smell, mold growth | 20–30 minutes |
| Fix window seals & tilt | Energy loss, temperature instability | 15–30 minutes |
Total time commitment: 75–120 minutes, once a season. That’s it.
The Seasonal Maintenance Schedule to Keep Things Running Smoothly
Doing these fixes once is great. Making them a habit is even better. Here’s an easy schedule to follow:
Before Summer (April–May):
- Deep clean coils
- Replace or wash air filter
- Clean drain pan thoroughly
- Inspect window seals and foam panels
- Test the unit before the heat sets in
Mid-Summer (July):
- Clean or check the filter
- Pour vinegar in the drain pan
- Look for new gaps around the window
End of Season (September–October):
- Full cleaning before storage
- Detach the unit and store it covered in a dry location
- If leaving it installed, wrap the outside with an AC cover to protect against winter weather
5 Mistakes People Make When Cleaning Their Window AC
Even with good intentions, it is all too easy to go astray. Watch out for these:
- Cleaning while plugged in — Unplug first. This is non-negotiable.
- Using a pressure washer or strong hose — Excess water pressure deforms fins and drives water into electrical components.
- Re-installing a wet filter — This promotes mold growth within the unit.
- Bending coil fins while cleaning — Use gentle strokes and a fin comb as necessary.
- Ignoring the outside of the unit — The condenser coils on the outdoor side need cleaning as well. Remember to clean both sides.
Most Common Questions About Window AC Cleaning and Maintenance
Q: How regularly should I clean my window AC unit? A: Once at the start of the cooling season, a full cleaning should suffice. Filter cleaning every 2–4 weeks during heavy use is recommended. A mid-season checkup in July is a good idea too.
Q: Is it advisable to use bleach to clean the drain pan? A: A diluted bleach solution (1 tablespoon of bleach per gallon of water) can do the trick, but white vinegar is a safer, non-toxic option that’s just as effective at killing mold and bacteria. Do not apply undiluted bleach on AC components.
Q: My window AC is dripping water inside my room. Why? A: This is often due to a blocked drain line or because the unit is tilted slightly forward rather than backward. Clear the drain line and adjust the angle so it drains outward.
Q: My AC smells like fish or something burning. What’s wrong? A: A fishy or burning smell may suggest an electrical problem. Don’t attempt to clean your way out of this — unplug the unit immediately and have it checked by a technician before using it again.
Q: Is cleaning an old window AC worth it or should I just replace it? A: As long as your unit is less than 8–10 years old, cleaning is almost always worthwhile. Replacement might be more cost-effective for units over 12–15 years old, especially if they’re still struggling after a thorough cleaning.
Q: Is it OK to spray water directly on the coils? A: A light spray is fine and in fact advised when applying a vinegar solution or coil cleaner. Do not saturate the unit or spray directly on electrical components or wiring.
Q: Will cleaning my window AC decrease my energy bill? A: Yes. Studies and real-world accounts consistently find that a clean window AC operates more efficiently — some estimates show as much as a 15% improvement in efficiency, which directly lowers your electricity bill over the course of a cooling season.
The Bottom Line
Maintaining your window AC is neither complicated nor expensive. These 4 easy fixes — cleaning the filter, scrubbing the coils, clearing the drain pan, and sealing the gaps in your windows — address some of the most common reasons an AC doesn’t perform well.
The best part? You’ll feel the difference on the same day you make these changes.
Your room will cool faster. The air will smell fresh. Your electricity bill will drop. And it will mean a longer life for your AC unit.
Don’t wait until something breaks. It takes only a few hours of maintenance per season to keep your window AC in top running condition — year in and year out.