

Meta Description: Window AC cleaning & maintenance guide fixes that transformed my summer comfort — discover 4 simple steps to boost cooling power, cut energy bills, and extend your unit’s life.
4 Steps I Followed – My Window AC Cleaning & Maintenance Guide That Improved Summer Comfort In No Time
Learn the Fixes to Clean Your AC Unit, Increase Cooling Power, Lower Energy Bills & Lengthen Life
My window AC unit was a disaster last July. It blasted out warm air, smelled musty, and my electricity bill was sky high. I nearly called a technician — until I decided to see if I could fix it myself.
What happened next surprised me.
As little as four effortless cleaning and maintenance steps turned it all around. My room cooled faster. The air smelled fresh. My energy bill dropped noticeably. And I didn’t have to spend a dime on a repair person.
This window AC cleaning & maintenance guide is all of it — plain, simple steps so that anyone can follow along. Whether your unit is borderline non-cooling or simply running rough, these fixes may be just what you’re looking for.
Why Most Window ACs Fail Just After One or Two Seasons
Window AC units are workhorses. They work for hours every day in summer, sucking in hot air and expelling cool air — again and again.
But here’s the problem.
When your air-conditioning unit draws in air, it also sucks up dust, pet hair, and pollen — and occasionally mold spores. All that gunk gets stuck inside the unit over time. When that occurs, your AC must work harder to do the same job.
Harder work = more electricity used = higher bills + shorter lifespan.
A dirty window AC can consume over 15% more energy than a clean one. That’s not a small number when you run it for eight hours a day.
The good news? There’s no special skill set or expensive tools required for cleaning and maintaining your window AC. It just takes a bit of time and the proper steps.
What You Will Need Before Getting Started
Before diving into the fixes, gather these basic supplies:
| Supply | Purpose |
|---|---|
| Screwdriver (flathead & Phillips) | Remove the front panel and grille |
| Soft bristle brush or old toothbrush | Scrub the filter and fins |
| Fin comb or butter knife | Straighten bent aluminum fins |
| Mild dish soap | Clean the filter |
| Spray bottle with water | Rinse components |
| Hydrogen peroxide or white vinegar | Kill mold and bacteria |
| Dry cloth or paper towels | Wipe down surfaces |
| Vacuum with brush attachment | Remove loose dust |
| Coil cleaner spray (optional) | Deep clean evaporator coils |
Most of this stuff is probably already in your home. The whole project can be done in 1–2 hours on a Saturday morning.
Fix #1 — My AC Was Suffocated by a Filthy Filter
What a Clogged Filter Really Does to Your AC
This was the most powerful fix I found.
In a window AC, the air filter is the first line of defence. It traps all of the dust, pet dander, and debris before it can get to the internal components. When it’s working properly, you hardly even notice it.
When it’s clogged? Everything suffers.
A dirty filter blocks airflow. When airflow is restricted, the evaporator coils can freeze over — in summer heat, no less. Your air conditioner runs nonstop, never actually cools your room very well, and consumes electricity like there’s no tomorrow.
My filter was so dirty — I hadn’t cleaned it in nearly a year. When I took it out, it looked like a gray felt blanket.
The Right Way to Clean Your Window AC Filter
Here’s exactly what I did:
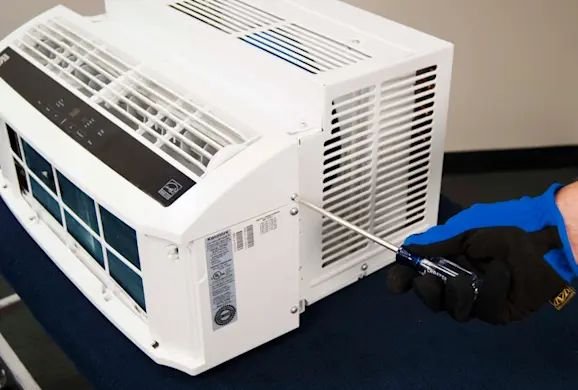
Step 1: Turn off and unplug the AC unit. Safety first — always.
Step 2: Remove the front panel or grille. This snaps off, or is held by one or two screws on most window units.
Step 3: Slide out the filter. It typically slides straight out from a slot.
Step 4: Bring the filter outside or over a trash can. Lightly tap it to dislodge any loose dust.
Step 5: Hold it under warm water in the sink. Use a little bit of dish soap and a soft brush to scrub both sides gently.
Step 6: Rinse well until the water runs clear.
Step 7: Allow it to air dry completely — a minimum of 30 minutes — before replacing it. A wet filter can cause mold growth.
Step 8: Reinstall and snap the panel back on.
How Frequently Do You Need to Clean the Filter?
| Usage Level | Recommended Cleaning Frequency |
|---|---|
| Light use (a few hours daily) | Once per month |
| Moderate use (6–8 hours daily) | Every 2–3 weeks |
| Heavy use (10+ hours daily) | Every 1–2 weeks |
| Homes with pets or allergies | Every week |
After I cleaned mine, I noticed a difference within the first hour of running the AC. The airflow was noticeably stronger. The room cooled down faster. It was as if I had received a brand-new unit for free.
Fix #2 — Bent Fins Were Secretly Destroying My Efficiency
What Are AC Fins and Why Are They Important?
AC fins are unknown to most people. I hadn’t heard of them either.
If you peek inside a window AC unit, you’ll see two banks of thin metal slats — like a very tight metal comb. These are called fins. One set rests on the evaporator coil (the cold side, inside your room), while the other sits on the condenser coil (the hot side, facing outside).
These fins are engineered to increase surface area for heat transfer. In plain terms: they allow your AC to move heat around efficiently.
Fins that get bent or squished — and they do so easily — obstruct airflow through the coils. The result is diminished cooling ability and increased energy consumption.
How I Straightened My Fins and What Changed
I didn’t even realize my fins were bent until I examined them closely. Some sections were flattened, most likely from when I installed the unit a few summers ago.
Here’s how to fix bent fins:
Step 1: Unplug the unit and remove the outer casing — typically 4–6 screws on the sides and back.
Step 2: In good light, inspect the fins. Bent fins will appear pressed together rather than evenly spaced.
Step 3: Use a fin comb (sold at hardware stores for a couple of dollars) or gently slide a butter knife between the fins to straighten them. Go slow — they’re thin and can tear.
Step 4: Work section by section, running the comb through gently to re-establish spacing.
Step 5: Reassemble the casing.
⚠️ Important: Fins are very sharp. Wear gloves if you have them. And be sure not to push too hard — you want to straighten, not bend further.
This one fix made a huge difference to the airflow of my AC. The outside of the unit began to emit more heat, which made the inside cool more effectively.
Fix #3 — Mold in the Drain Pan Was Filling My Air With Filth
The Unpleasant Truth About Window AC Drain Pans
Here’s something no one tells you when you purchase a window AC unit.
Your AC pulls humidity out of the air each time it runs. That moisture accumulates in a drain pan at the bottom of the unit. In a healthy AC, that water drains outside through a small hole or evaporates through the condenser.
But when that standing water combines with dust, dirt, and organic material? You get mold and mildew — quickly.
That musty smell coming from your AC? Almost always the drain pan.
I opened my unit and found a layer of nasty black sludge in the drain pan. It was genuinely disgusting. And every time the AC kicked on, it was blasting that moldy air straight into my room.
For more in-depth seasonal tips and step-by-step AC care routines, Window AC Maintenance is a great resource to bookmark.
Step-by-Step: Cleaning the Drain Pan and Drain Hole
Step 1: Unplug the unit and take it out of the window if you are able to. This makes cleaning much easier.
Step 2: Remove the outer casing to expose the drain pan at the bottom of the unit.
Step 3: Absorb any standing water using paper towels.
Step 4: Mix equal parts white vinegar and water in a spray bottle. Spray the entire pan generously.
Step 5: Allow it to sit for 10–15 minutes to kill mold and bacteria.
Step 6: Scrub with an old toothbrush or small brush. Focus on corners and edges.
Step 7: Locate the drain hole — most often a small opening in the bottom or back. Clear out any clogs with a toothpick or thin brush.
Step 8: Rinse the pan with clean water and dry it with a cloth.
Step 9: Optional but recommended — spray a light coat of hydrogen peroxide on the pan and let it air dry. This slows future mold growth.
Preventing Mold from Coming Back
| Prevention Method | How It Helps |
|---|---|
| Run AC on “Fan Only” mode for 15 mins before shutting off | Dries out internal moisture |
| Add a few drops of white vinegar to the pan every month | Natural mold inhibitor |
| Keep filters clean | Less debris = less food for mold |
| Ensure proper tilt (back slightly lower than front) | Helps water drain outside |
After cleaning the drain pan, the musty smell was entirely gone by the next day. The air blowing from the AC smelled fresh and neutral — as it should.
Fix #4 — Dirty Coils Were Making My AC Work WAY Too Hard
What Coils Do and Why Dirt Kills Their Performance
Your window AC has two sets of coils:
- Evaporator coils — these are inside your room, getting cold and absorbing heat from your air
- Condenser coils — these are outside your home, releasing the heat outdoors
Both sets of coils need to be relatively clean in order to do their jobs well.
Coils coated in dust and grime can no longer transfer heat efficiently. Your AC must run longer cycles to reach the same temperature. That’s one of the main reasons an AC unit that used to cool a room in 20 minutes now takes an hour.
According to the U.S. Department of Energy, dirty coils can cut your AC’s efficiency by as much as 30%. That’s a massive impact.
How to Clean Evaporator and Condenser Coils Safely
This step sounds scary but it is very doable.
For Light Cleaning:
Step 1: With the unit unplugged and casing removed, use the brush attachment on your vacuum to gently run over both sets of coils. Move in the direction of the fins — up and down, not sideways.
Step 2: Use a soft-bristled brush to dislodge stuck-on dust. Then vacuum again.
For Deep Cleaning (Every Season):
Step 1: Buy a no-rinse coil cleaner spray from your local hardware store. It’s inexpensive and effective.
Step 2: Apply it evenly across the evaporator coils.
Step 3: The foam will penetrate the coils, break down grime, and then drain into the pan when the AC runs. No rinsing needed.
Step 4: For condenser coils, spray from the outside of the unit and allow the solution to run off.
💡 Pro tip: Schedule this cleaning early in the summer, before heavy use begins. It makes a huge difference in how the unit performs all season long.
After cleaning both sets of coils on my unit, it began to reach the set temperature much more quickly. I could actually hear the difference — the compressor cycled off sooner because the room was cooling efficiently.

Putting It All Together — My Full Summer Maintenance Routine
Now that I’ve covered all four fixes, here’s the simple seasonal routine I use to keep my window AC running like new:
At the Start of Summer (May–June)
- Deep clean the filter
- Inspect and straighten bent fins
- Clean the drain pan and check the drain hole
- Deep clean coils with coil cleaner spray
- Inspect window seal (foam weatherstripping) for gaps
Every 2–3 Weeks During Summer
- Remove and rinse the filter
- Wipe down the exterior grille
- Check for unusual noises or odors
At the End of Summer (September)
- Full cleaning before storage
- Run the unit on “Fan Only” mode for 30 minutes to dry internal moisture
- Cover the unit or store it indoors to prevent winter damage
How Much Can You Really Save?
Here’s a rough idea of what you can save in energy from regular maintenance:
| Maintenance Action | Estimated Energy Savings |
|---|---|
| Clean air filter | 5–15% |
| Straighten bent fins | 5–10% |
| Clean drain pan (airflow improvement) | 2–5% |
| Clean evaporator and condenser coils | 10–30% |
| Total potential savings | Up to 40–60% in extreme cases |
A conservative 15% improvement in efficiency on a unit that costs $60/month to run saves you $9/month — or roughly $54 over a typical six-month summer. That adds up over the years.
Signs That Your Window AC Needs Immediate Attention
Don’t wait for your AC to break down completely. Watch for these warning signs:
- Weak airflow — most commonly a clogged filter or bent fins
- Stale or sour smell — almost always a sign of mold in the drain pan
- Room takes forever to cool — dirty coils or clogged filter
- Ice forming on the unit — restricted airflow causing coils to freeze
- Unusual noises (rattling, banging) — loose parts or debris inside
- Water leaking inside — clogged drain hole
If you notice any of these, the solutions in this guide are an excellent first step before calling a repair person.
Frequently Asked Questions
Q: How frequently should I do a thorough window AC cleaning? A: At least once a year — or better yet, early summer. For heavy use, clean your filter every 2–4 weeks.
Q: Can I clean my AC unit with a pressure washer? A: No. High-pressure water can damage fins and force water into electrical components. Stick to gentle spraying and a soft brush.
Q: Can I safely use bleach to clean the drain pan? A: It may work, but diluted white vinegar or hydrogen peroxide are better and safer choices that won’t damage metal parts or leave toxic residue.
Q: My AC still smells after cleaning the drain pan. What now? A: Inspect the evaporator coils — mold can grow there too. An antibacterial coil cleaner spray can help with persistent odors.
Q: How can I tell if my AC fins are too damaged to repair? A: If large sections have ripped or collapsed entirely, a service professional should inspect the unit to determine if it’s worth fixing. Minor bending is always fixable at home.
Q: Can dirty coils make my AC stop working completely? A: Yes. Dirty evaporator coils can ice over entirely and block airflow. At that point the unit either shuts down or blows only warm air until the ice melts.
Q: Do I need a professional for annual maintenance? A: For most window units, the DIY steps in this guide should be sufficient. Professional service is a good option for refrigerant problems (unit not cooling at all despite clean components) or electrical issues.
The Bottom Line
These four fixes turned my window AC from a summertime scourge into an energy-saving hero. Weak airflow, foul odors, high electricity costs, and a room that never really worked well.
Then one Saturday morning, armed with a screwdriver, a spray bottle, and mild soap — everything changed.
The window AC cleaning & maintenance guide steps I’ve shared here don’t require professional training. They don’t require expensive parts. They just take a little bit of your time and some willingness to peer inside that unit and give it some attention.
Your AC is already doing the most for you each summer. A little care in return pays off — in comfort, in air quality, and in money saved.
Give it a try this season. You may be just as surprised as I was.