

Meta Description: Window AC cleaning & maintenance is the secret to dust-free, effective cooling throughout summer. Check out 11 tried-and-true tips for keeping your unit running like the day you bought it.
11 Fantastic Tips to Clean & Maintain Window AC for Dust-Free Cooling
Is your window AC blowing hot air? Making strange noises? Or simply not as cool as it once was?
You’re not alone. Over the summer, when this happens, most people neglect their AC unit until something goes wrong. But here’s the reality — a window AC that is dirty and poorly maintained has to work harder, costs more to run, and will break down faster.
The good news? You don’t have to be a technician to keep it in peak condition.
With this guide you’ll get 11 proven, easy-to-execute window AC cleaning and maintenance tips that will make your unit run cleaner, cooler, and last longer. Whether you’re a first-timer or simply in need of some inspiration for your current routine, this article has everything you need.
Let’s get into it.
The Importance of Window AC Maintenance
Before we leap into the tips, let’s talk about why you should even spend your time on this.
A window AC you don’t clean regularly:
- Reduces cooling efficiency by as much as 25 percent (U.S. Department of Energy)
- Consumes significantly more electricity
- Disperses dust, allergens, and mildew throughout your room
- Has a shorter lifespan overall
On the other hand, a well-maintained unit will cool more quickly and use less energy. With proper care, it could last 10 to 15 years.
That’s a huge payoff for very little effort.
What You’ll Need to Get Started
Collect these supplies before you start any cleaning:
| Supply | Purpose |
|---|---|
| Screwdriver | Take the front panel and grille off |
| Soft brush or toothbrush | Clean up fins and corners |
| Vacuum with brush attachment | Pick up loose dust |
| Mild dish soap | Cleaning filters |
| Warm water | Rinsing filters and coils |
| Fin comb | Straightening out bent aluminum fins |
| Coil cleaner spray | Deep clean evaporator/condenser coils |
| Cloth or microfiber towel | Wiping down surfaces |
| Gloves and mask | Protect yourself from dust and mold |
Having everything ready will make the job much easier before you start.
Tip #1 — Power Down and Disconnect First
This may sound like a no-brainer, but it’s the most-bypassed step in the process.
Never try cleaning your window AC without first unplugging it.
Even when the unit is switched off, it continues to receive electricity as long as it’s connected to a power supply. Working on a plugged-in AC can be hazardous and dangers including electric shock may arise.
After you unplug it, wait 15 to 20 minutes for the unit to cool down before handling internal components. This is especially true in the case of a unit that was running recently.
Quick Safety Checklist
- ✅ Turn off the unit
- ✅ Unplug from the wall outlet
- ✅ Let it sit for 15–20 minutes before opening
- ✅ Wear gloves and a dust mask
Starting safe means finishing safe.
Tip #2 — Clean or Replace Your Air Filter Every 2–4 Weeks
The air filter is the single most important part to clean — and also the one that gets neglected.
It captures dust, pet hair, pollen, and other particles before they can get to the cooling coils. When it becomes clogged, airflow decreases massively. Your room cools down slower, and your electricity bill increases.
How to Clean a Reusable Filter
- Take off the front panel of your AC unit
- Pull out the filter (lifting it out should be pretty straightforward)
- Hold it up to a light source — if it’s not see-through, it definitely needs cleaning
- Run it under warm tap water
- Use a soft brush with mild soap if heavily soiled
- Wait at least 1–2 hours for it to dry completely before putting it back
Do not return a wet filter to the unit. Mold can thrive in moisture inside the AC.
Knowing When to Replace Instead of Clean
If you find rips or holes in your filter, or if it doesn’t come clean after washing, it’s time to replace. Replacement filters are inexpensive and readily available.
| Filter Condition | Action |
|---|---|
| Light dust buildup | Rinse with water |
| Heavy soil or odor | Wash with soap and water |
| Torn or worn out | Replace immediately |
| Mold visible | Replace + clean the unit |
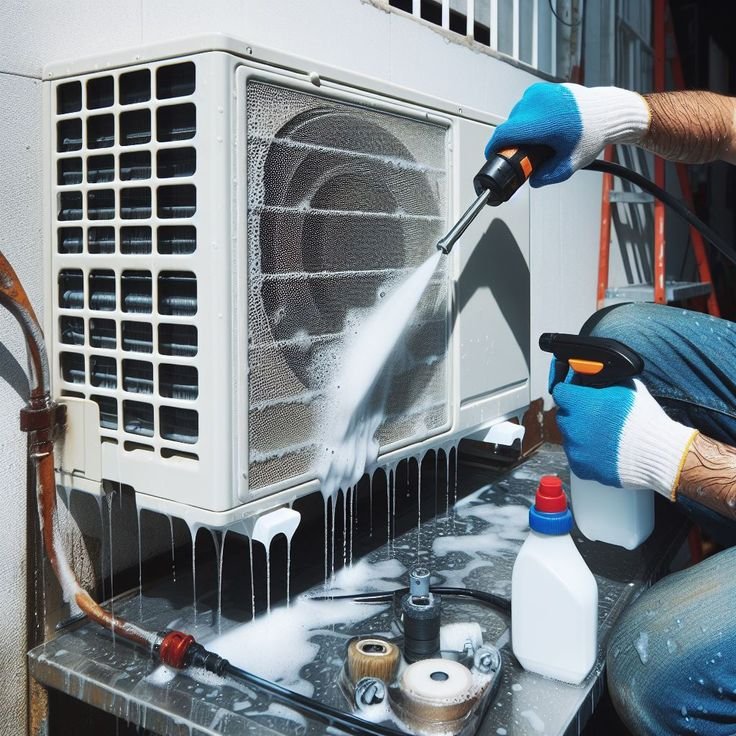
Tip #3 — Clean the Front Grille and Outer Casing
Just like any surface in your home, dust collects on the outside of your AC unit.
A filthy grille can impede airflow no matter how clean your filter is. It also makes the room look messy, and can send dusty air into the space.
How to do it:
- First, wipe the front grille with a dry microfiber cloth
- Moisten the cloth with a bit of water — no strong chemicals
- Wipe down the complete outer casing
- Use a toothbrush or soft brush to get into the grille slots
If your AC runs daily, do this weekly. It takes less than five minutes and makes a noticeable improvement in both looks and airflow.
Tip #4 — Vacuum and Brush the Evaporator Coils
The evaporator coils are located just behind the filter. They’re the ones that absorb heat from the air in your room — which is how cooling actually works.
They cannot absorb heat properly when dust and grime are caked on the coils. The result? Your AC works longer yet cools less.
Cleaning the Evaporator Coils
- Once you remove the filter, you’ll see the coils — a series of thin metal fins
- Gently vacuum with a soft brush attachment to remove dust
- Avoid bending the fins — they are delicate
- For tougher cleaning, use a no-rinse coil cleaner spray that you can find at most hardware stores
- Spray it on, let it foam and dissolve the dirt, and it drains away on its own
Do this every 1 to 2 months through heavy cooling season.
Tip #5 — Use a Fin Comb to Straighten Bent Fins
Examine your evaporator or condenser coils closely. See any bent or squished metal fins?
Bent fins reduce airflow through the coil and hinder the AC from cooling efficiently. This occurs from rough handling, debris, or even simply years of use.
A fin comb is an inexpensive, simple tool specifically built for this task. You gently run it along the fins to straighten them back into place.
How to use a fin comb:
- Match your fins to the correct teeth-per-inch setting
- Insert gently at the base of the bent section
- Pull straight and slow — don’t force it
- Work in small sections
It may seem like a step that is often skipped, but this can greatly improve airflow and cooling performance.
Tip #6 — Clean the Condenser Coils on the Outdoor Side
Your window AC unit has two coils. The evaporator faces your room. The condenser faces outside.
The condenser expels the heat it has drawn from your room into the outside air. It’s exposed to wind, rain, dust, pollen, leaves, and insects — which means it gets dirty quickly.
For a deeper look at seasonal coil care and more expert advice, visit Window AC Maintenance Blog — a dedicated resource for keeping your cooling system in top shape year-round.
How to Clean the Condenser Side
- Look through or around the back of the unit (while it’s still in the window) or remove the unit entirely for easier access
- Use a vacuum or brush to clear any visible debris
- Apply coil cleaner on the fins
- Allow it to rest for 5–10 minutes, then rinse with a gentle stream of water (if the unit is detached)
- Wait until it is completely dry before reinstalling
Perform this at least once at the beginning of the cooling season, and once mid-season if you run your AC heavily.
Tip #7 — Inspect the Drainage System and Clear It
As window ACs cool the air, they produce condensation. This water must remain properly drained.
Most units have a small drain pan and a drain hole at the back. Over time, these become clogged with algae, dirt, or debris and the water backs up inside the unit. You’ll notice:
- Water leaking from the front of the unit (instead of the back)
- A musty or moldy smell
- Reduced cooling performance
How to Clear the Drain
- Find the drain hole on the bottom back of the unit
- Free any obstruction with a thin wire, pipe cleaner, or small brush
- Clean the drain pan with a mix of water and a few drops of bleach (1 tablespoon per cup of water)
- This kills mold and algae that lead to future clogs
Inspect the drainage system monthly during heavy use.
Tip #8 — Check the Window Seal and Insulation
This is one that falls through the cracks almost without fail — but it’s a huge deal.
Your window AC should be forming a tight seal with the window frame. If gaps are opening, warm outdoor air pours in and cool air escapes. Your AC works overtime to compensate, leaving you with larger power bills and less comfort.
What to Look For
- Gaps between the AC unit and the window frame
- Ripped or worn foam insulation strips
- Loose accordion side panels that don’t extend all the way out
How to Fix It
- Replace damaged foam weather stripping (available at any hardware store)
- Press the accordion panels firmly against the window frame
- Use window insulation film or foam tape to fill any remaining gaps
This simple fix can lower summer energy use by 10–15% — substantial savings over the course of the season.
Tip #9 — Listen for Unusual Sounds and Fix Them Early
Your AC literally tells you when something’s wrong — you just have to listen.
| Sound | Possible Cause | What to Do |
|---|---|---|
| Rattling | Loose panel or debris inside | Check and tighten panels, remove debris |
| Squealing | Fan belt or motor problem | Call a technician |
| Banging | Fan blade hitting something | Turn off immediately, inspect fan |
| Buzzing | Electrical or wiring issue | Unplug and call a technician |
| Hissing | Possible refrigerant leak | Call a certified HVAC technician |
| Gurgling | Normal condensate drainage | Usually okay, monitor it |
Don’t ignore unusual sounds. Catching a small problem early can save you a costly breakdown later.
Tip #10 — Conduct a Maintenance Check at the Beginning of Each Season
Before you turn on your AC for the first time each summer, do a full check-up.
It’s the best time to identify issues before they become problems during a heatwave.
Pre-Season Maintenance Checklist
- ✅ Clean or replace the air filter
- ✅ Wipe down the outer casing and grille
- ✅ Vacuum evaporator coils
- ✅ Clean condenser coils
- ✅ Inspect and clear the drain pan and hole
- ✅ Check the window seal and foam strips
- ✅ Test all fan speed settings and cooling modes
- ✅ Inspect the power cord for damage or fraying
- ✅ Make sure the unit sits level in the window (for proper drainage)
- ✅ Run the unit for 15–20 minutes and listen for any unusual noises or smells
This thorough check-up takes about 30 to 45 minutes and prepares you for a worry-free cooling season.
Tip #11 — Store Your Unit Properly During the Off-Season
If you take out your window AC in the fall or winter, how you store it matters.
Poor storage results in dust buildup, pest infestations inside the unit, and damage to internal components. A well-stored AC is all set when warmer months come calling.
Smart Storage Steps
- Clean it thoroughly before storing — don’t put away a dirty unit
- Let it dry completely — moisture left inside can grow mold
- Cover it with the original box or a breathable AC cover — avoid plastic bags that trap moisture
- Store upright — never on its side or upside down, which can damage the compressor
- Keep it somewhere dry — garages are fine as long as they don’t get too damp
If you leave the unit installed over winter, cover the outdoor side with an insulated AC cover. This prevents cold drafts from entering and protects the unit from debris and weather elements.
How Often Should You Perform Each Task?
| Maintenance Task | How Often |
|---|---|
| Wipe down grille and outer casing | Weekly |
| Clean air filter | Every 2–4 weeks |
| Vacuum evaporator coils | Monthly (during use) |
| Check and clear drain | Monthly |
| Clean condenser coils | Start and mid-season |
| Inspect window seal | Every season |
| Straighten fins | As needed |
| Full pre-season check | Once a year (before first use) |
| Deep clean before storage | Once a year (before storing) |
When You Need to Call a Technician
Some issues are not for the do-it-yourselfer. According to Energy Star’s guidance on home cooling systems, professional servicing is essential when internal components are involved. If you notice any of the following, call a certified HVAC technician:
- Ice forming on the coils — could be a refrigerant or airflow issue
- Electrical burning smell — a potential fire hazard
- AC trips the circuit breaker repeatedly — a wiring issue
- No cooling at all despite running fine — may be compressor failure
- Refrigerant hissing or visible leaks — requires certified handling
Do not try to service refrigerant on your own. It’s a regulated substance and requires professional equipment.
Frequently Asked Questions About Window AC Cleaning and Maintenance
Q: How frequently should I clean my window AC filter? Every 2 to 4 weeks during regular use. If you have pets or allergies, clean it every one to two weeks.
Q: Can I use a pressure washer to clean the coils? No. High pressure can damage the delicate aluminum fins. Instead, use a gentle water stream or a no-rinse coil cleaner.
Q: My AC smells musty. What does that mean? A musty odor typically indicates that mold or mildew has developed inside the unit — usually in the drain pan or on the coils. Thoroughly clean the drain system and coils. If the odor remains, the unit may require a more in-depth professional cleaning.
Q: Can I operate the AC without a filter? It will technically run, but dust and debris will coat the evaporator coils directly, slowly destroying it. Always keep a clean filter in place.
Q: How can I tell if my AC needs refrigerant? Symptoms include poor cooling even when the unit is on, ice forming on the coils, and a hissing noise. Refrigerant doesn’t actually just “run out” — a leak is most often to blame. Have a technician come out to check and repair it.
Q: Can I clean my window AC without taking it out of the window? Yes, for regular maintenance tasks such as filter cleaning, grille wiping, and coil vacuuming. It’s easier and more thorough to take the unit out for deep cleaning of the condenser coils.
Q: At what temperature should I set my window AC for efficiency? 78°F (26°C) when you’re at home, and higher when you’re away, according to the U.S. Department of Energy. For every degree lower, energy consumption rises by about 3%.
Q: What is the lifespan of window AC units? Proper cleaning and maintenance can extend the life of a window AC to 10 to 15 years. When units are neglected, they typically fail within 5 to 7 years.
Wrapping It All Up
Cleaning and maintaining a window AC isn’t complicated — but it demands consistency.
The 11 tips in this guide range from the simple (cleaning the filter, wiping down the grille) to the more detailed (cleaning coils, straightening fins, clearing drains). Combined, they keep your unit running smoothly, your air clean, and your energy bills low.
What is the biggest mistake most people make? Not taking action until something breaks.
Don’t wait for a heatwave to find out your AC is struggling. Establish a simple schedule, stick to this guide, and your window AC will reward you with years of dependable, dust-free cooling.
So get started today with Tip #1 — unplug it and rinse that filter out. You will notice the difference right away.