Meta Description: Window AC cleaning & maintenance tasks most people ignore can cost you hundreds in repairs. Learn 8 essential steps to keep your unit running efficiently all season.
8 Window AC Cleaning & Maintenance Guide Tasks Most People Ignore
You switch on your window AC, and it blows hot air. Or maybe it smells musty. Or your electricity bill rises $40 more than last summer.
Sound familiar?
The average person only thinks about their window AC when something goes awry. By then, the damage has already been done. The good news? A bit of regular maintenance can prevent nearly every common AC issue — and save you some major money.
This guide includes 8 window AC cleaning and maintenance steps most homeowners gloss over. They’re easy. They don’t require a technician. And they can prolong the life of your unit by years.
Let’s get into it.
Why Window AC Maintenance Is Never a Thing (And Why It Should Be)
Life gets busy. Window ACs appear to be “set it and forget it” gadgets. You plug them in, push the power button and wait for cold air.
Inside that metal box, however, a lot is happening. Air is being sucked in, filtered, cooled and blown out — all the time. Dust builds up. Moisture collects. Mold flourishes in dark, damp places. Coils get coated in grime.
Your AC has to work harder and harder over time to accomplish the same job. That means:
- Higher electricity bills
- Weaker cooling performance
- Shorter unit lifespan
- Poor indoor air quality
- Expensive repairs or early replacement
An average window AC unit can last 8–10 years with care. Unattended units will fail within 4–5 years. That’s a $300–$700 replacement you could have caught early.
Task #1: Clean or Replace the Air Filter (The Thing Everyone Forgets After Month One)
The first line of defence for your AC is the air filter. It catches dust, pet hair, pollen and debris before they can reach the internal components.
Most people clean it once at the beginning of the season — and then forget about it completely.
The problem is that a dirty filter restricts airflow. If airflow is limited, the AC must work harder to draw in air. This can reduce cooling efficiency and strain the motor.
How Often Do You Need to Clean It?
| Usage Level | Filter Cleaning Frequency |
|---|---|
| Light use (a few hours/day) | Every 3–4 weeks |
| Moderate use (6–8 hours/day) | Every 2 weeks |
| Heavy use (all day, daily) | Every 1 week |
| Homes with pets or allergies | Every 1 week |
How to Clean It
- Turn off and unplug the unit.
- Unclip or pop off the front panel (it generally just snaps off).
- Slide out the filter.
- Wash it under warm running water.
- If you have debris stuck, use a soft brush.
- Allow it to air-dry completely before putting it back.
- Do not insert a wet filter back in — it encourages mold.
If the filter appears greasy, twisted or has holes, replace it. Replacement filters cost only $5–$15 and are well worth the money.
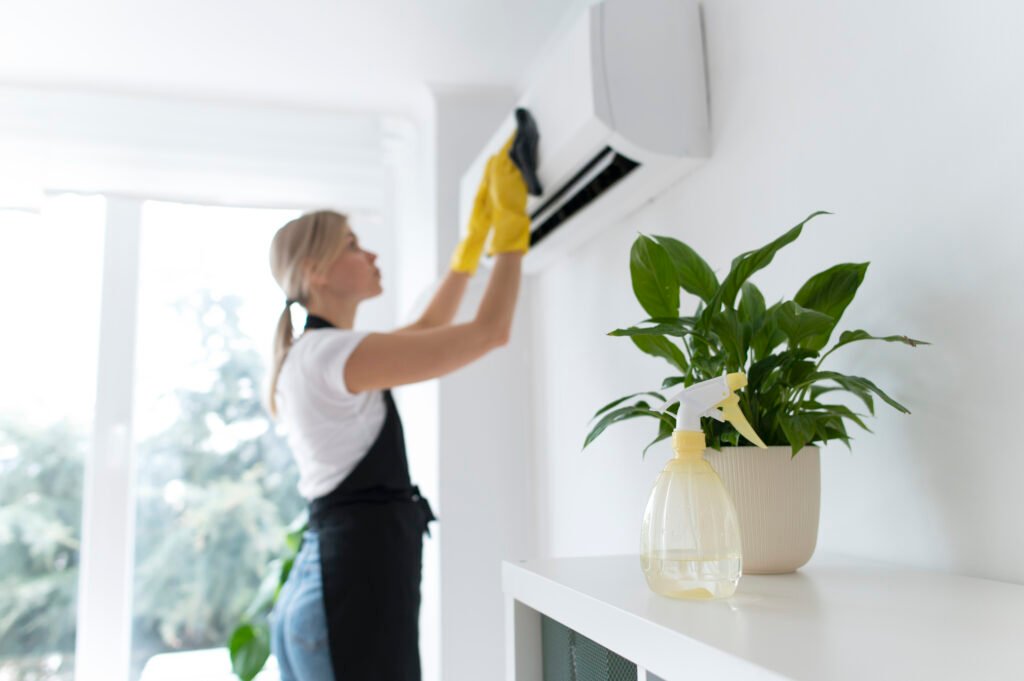
Task #2: Clean the Evaporator Coils (Most People Have Never Even Looked at These)
The evaporator coils sit behind the filter. These are the cold metal fins that cool down the air flowing through your room.
Over time, dust and dirt accumulate on these coils like a fine blanket. When that occurs, the coils can’t properly absorb heat. Your AC has longer cycles, uses more power and fails to cool the room as effectively.
How to Know if Your Evaporator Coils Need Cleaning
- It takes forever to cool down the room
- AC works continuously but temperature hardly reduces
- There is ice or frost on the unit
- Higher than usual electricity bills
How to Clean the Evaporator Coils Step by Step
- Unplug the AC completely.
- Take off the front panel and filter.
- A soft brush or a fin comb will help you gently remove loose debris.
- Apply a no-rinse evaporator coil cleaner (found at hardware stores for $8–$15) directly to the coils.
- Let it fizz and run into the drain pan — it will self-clean as it runs off.
- Avoid bending the fins. They’re delicate.
Try to do this at least once a year — and before the cooling season begins, if possible.
Task #3: Clean the Condensate Drain Pan and Drain Line (Mold’s Favorite Hiding Place)
As your AC cools air, it extracts moisture from the air. That moisture drips into a drain pan and then flows down a small drain line.
Here’s the problem: standing water + darkness + warmth = mold, algae and bacteria.
If a drain pan is blocked, water will get stuck in the unit before leaking into your walls or dripping into your room. Worse, it pumps musty air straight into your living space every time the fan runs.
How to Clean the Drain Pan
- Unplug the unit.
- Get to the drain pan (you might have to take the unit out of the window a little bit).
- Use a wet/dry vacuum or rags to soak up standing water.
- Combine equal parts of white vinegar and water.
- Add it to the pan and allow it to sit for 10–15 minutes.
- Use a clean cloth to wipe down all surfaces.
- Use a small brush or pipe cleaner to clear the drain hole.
Repeat every 4–6 weeks during heavy use months. If you see black or green slime, clean it immediately.
Task #4: Straighten the Condenser and Evaporator Fins (Small Fix, Big Impact)
Examine the metal grills on your AC — inside and outside. Those small, thin pieces of metal are called fins. They’re built to give maximum airflow over the coils.
But fins bend easily. Pets, children, accidental bumps or even rough scrubbing can bend them out of shape. Bent fins inhibit airflow and diminish efficiency.
This is one of the most neglected window AC maintenance chores — and one of the easiest to correct.
What You’ll Need
- A fin comb ($8–$12 at most hardware stores)
- Gloves (the fins can be sharp)
- A flashlight
How to Straighten Bent Fins
- Unplug the unit.
- Run a flashlight across the fins at an angle — bent areas will be easy to spot.
- Carefully slide the fin comb through the bent part.
- Work slowly. Don’t force it.
- The idea is to get fins parallel and evenly spaced.
You don’t need to get every fin perfectly straight. Just reopen any areas that appear visibly crushed or blocked.
Task #5: Clean the Condenser Coils (The Outdoor Side No One Touches)
Your window AC consists of two sets of coils. The inside evaporator coils cool the air. The condenser coils (on the outside) discharge heat pulled from your room.
The outside-facing side of your unit faces open air. It gathers leaves, grass clippings, bugs, cottonwood fluff and dirt year-round.
If your condenser coils are clogged, your AC can’t release heat properly. It overheats. It works harder. It might even shut down to protect itself from damage.
How to Clean the Condenser Coils
- Unplug the unit.
- If you can, gently take the unit out of the window and put it on a flat surface outside.
- Rinse the outside fins with a garden hose on low pressure — spray from inside out.
- Never use a pressure washer — it will bend the fins.
- A soft brush will help remove stubborn debris.
- Allow the unit to dry completely before replacing.
If you can’t remove the unit, apply a coil cleaning spray that is specifically made for outdoor condenser coils. Apply, let sit and then rinse with low-pressure water.
Pro tip: For a deeper look at seasonal coil care and more expert window AC advice, visit Window AC Maintenance — a dedicated resource for keeping your unit in top shape year-round.
Task #6: Inspect and Improve the Window Seal (Cold Air Is Leaking Out Right Now)
Most folks put their window AC in, seal up the side accordion panels, and feel they are finished. But in one season, those seals move, crack or compress.
A poor window seal means:
- Cold air leaks outside
- Hot air sneaks inside
- Your AC keeps running trying to make up for it
- Energy bills go up
This is one of the easiest window AC maintenance steps you can take — and one of the most effective.
The Tape-and-Test Method
- On a hot day, let your AC run for 10 minutes.
- Gently guide your hand around the perimeters of the installation — sides, top and bottom.
- Check for warm air coming in or cold air escaping.
- Use painter’s tape to mark any gaps.
How to Fix the Seal
| Gap Type | Best Fix |
|---|---|
| Small gaps around accordion panels | Foam weather stripping tape |
| Gaps between window sashes | Rope caulk (removable) |
| Light bleeding through side panels | Panel replacement or foam inserts |
| Loose mounting screws | Tighten and add foam backing |
Weather stripping and rope caulk are both affordable (under $10) and simple to use. Spending 20 minutes doing this at the beginning of every cooling season can show significant energy savings.
According to the U.S. Department of Energy, sealing and insulating around cooling equipment is one of the most cost-effective ways to reduce your home energy bills — making this task well worth your time.
Task #7: Inspect and Clean the Fan Blower Wheel (The Dusty Spinner Inside)
Within your window AC, there’s a fan known as the blower wheel (or squirrel cage fan) that draws air over the evaporator coils and pushes it into the room.
This fan is located deep inside the unit. Most people never see it. But eventually it builds up dust, lint and debris on each blade. Even a thin layer of buildup alters the blade shape — and how much air it can move.
A coated blower wheel results in weak airflow even with the AC running at full throttle.
Signs of a Dirty Blower Wheel
- Airflow feels weak even on high fan speed
- You hear a slight rattling or vibrating sound
- The unit smells musty when turned on
Cleaning the Blower Wheel
This task requires partial disassembly. If appliance work makes you nervous, this is a task that can be stretched to once every 2–3 years — but ideally should not be skipped.
- Turn off the unit and take it out of the window.
- Unscrew the outer casing (typically 4–8 screws around the perimeter).
- Find the blower wheel — it’s a cylinder that resembles a cage with small fins.
- Scrub each blade with a small brush or old toothbrush.
- For stuck-on grime, a wet cloth with mild dish soap does the trick.
- Allow to dry fully before reassembly.
If you’d prefer visual instruction, there are plenty of video tutorials available online specific to your AC make and model.
Task #8: Inspect Electrical Connections and the Power Cord (Safety First)
This task is ignored almost universally — until something goes wrong.
Window ACs consume a large amount of electricity. Electrical connections can loosen with years of use. Power cords can fray around the plug or where they enter the unit. Constant load can damage the outlets.
A loose or damaged electrical connection is a fire risk. It can also make your AC act strangely — shutting itself off at random, tripping breakers or refusing to start at all.
What to Check Annually
| Component | What to Look For |
|---|---|
| Power cord | Fraying, cracking or discoloration |
| Plug prongs | Bent, blackened or loose prongs |
| Wall outlet | Scorch marks, looseness, tripping breaker |
| Cord near unit | Pinching, sharp bends, heat damage |
| Control panel | Sticky buttons or moisture damage |
Safety Rules to Follow
- Never use an extension cord with a window AC. Plug directly into a wall outlet.
- If the AC trips the breaker when you plug it in, consult an electrician.
- If you notice any burn marks or the smell of burning plastic, immediately stop using the unit.
- If you have a frayed cord, replace it — don’t tape over it.
Most window ACs do not require an electrical overhaul every year. But a quick visual check takes two minutes and could prevent a serious problem.
Seasonal Maintenance Schedule: What Needs to Be Done and When
Staying consistent is the hardest part of AC maintenance. Here’s an easy schedule you can follow:
| When | Task |
|---|---|
| Start of cooling season | Clean filter, wash evaporator coils, check window seal, inspect power cord |
| Every 2–4 weeks (in use) | Clean or rinse the air filter |
| Every 4–6 weeks (in use) | Clean drain pan, check for mold |
| Mid-season | Inspect condenser coils, straighten any bent fins |
| End of season | Full cleaning of all components, clean blower wheel |
| Before storing for winter | Thoroughly dry, cover or store in box to avoid dust buildup |
Print this out. Put it on your fridge. Set phone reminders. Whatever works for you — just make it a habit.
Tools and Supplies to Keep on Hand
You don’t need a toolbox packed with gear. Here’s a basic kit that addresses each task in this guide:
- Fin comb — $8–$12
- No-rinse evaporator coil cleaner spray — $10–$15
- Condenser coil cleaner spray — $10–$15
- Foam weather stripping tape — $6–$10
- Rope caulk — $5–$8
- Soft-bristled brush or old toothbrush — free or $2
- White vinegar — $3
- Wet/dry vacuum (optional but useful) — $30–$60
- Screwdriver set — $10–$20
Overall cost: About $50–$80 for a full kit that lasts multiple seasons.
FAQs: Window AC Cleaning and Maintenance
How frequently should I deep-clean my window AC unit? Do a complete cleaning — coils, drain pan and blower wheel — at least once per year. The ideal time is just before the cooling season so your unit is prepared for significant use.
Can I clean my window AC without removing it from the window? Yes, for most tasks. Filter cleaning, coil spraying, drain pan cleaning and fin straightening can all be done in place. Removing the unit makes cleaning the condenser coils and blower wheel easier, but it’s not always necessary.
What happens if I don’t clean the drain pan? A filthy drain pan harbors mold and bacteria. It can lead to musty smells, water seeping into your house and bad indoor air quality. In extreme cases, it can cause water damage to walls or flooring.
Why does my window AC smell bad when I turn it on? A musty smell typically indicates mold or bacteria on the drain pan, evaporator coils or blower wheel. Cleaning all three tends to eliminate the odor. A burning smell might mean an electrical component is malfunctioning — stop using the unit and inspect it before running it again.
Can I use a pressure washer on my AC coils? No. A pressure washer will bend or crush the fins on the coils. Instead, use a garden hose on a gentle setting or a coil cleaning spray.
Could dirty coils be the reason my AC freezes up? Yes. Dirty evaporator coils impede heat exchange. The refrigerant inside becomes too cold and freezes the coils. This cuts off airflow and compounds the problem. If you notice frost or ice on your unit, switch it off, let it thaw, then clean the coils before running it again.
Do I need to cover my window AC in winter? If you keep it installed, use an outdoor AC cover to shield the condenser side from ice, snow and debris. Even better — take it off for the winter, give it a thorough cleaning and store it indoors in a clean, dry area.
When should I call a professional instead of doing it myself? Call a technician if there are burning smells, if the unit trips breakers often, if refrigerant is leaking (you’ll see oily residue near the coils or notice the unit never cools properly) or if the compressor is making loud grinding or clicking noises. These are issues that go beyond cleaning and require diagnosis by a professional.
Wrapping It All Up
A window AC is a straightforward machine — but it does require periodic attention to do its job well.
Most of the eight tasks in this guide take 15–30 minutes each. None of them require exceptional skills. And together, they can extend the life of your unit by years while keeping your energy bills lower and your indoor air cleaner.
Here’s a quick rundown of the 8 tasks most people overlook:
- Clean or replace the air filter regularly
- Wash the evaporator coils annually
- Clean the drain pan and drain line every month
- Straighten bent condenser and evaporator fins
- Clean the condenser coils on the outdoor side
- Inspect and improve the window seal every season
- Clean the blower wheel every 2–3 years
- Check electrical connections and the power cord annually
Pick one task this weekend. Start small. Build the habit. Your AC unit will thank you with years of reliable, efficient cooling — and so will your wallet.