I remember the summer of 2022 like it was yesterday. The heat waves were relentless, and my little apartment in the city felt like a sauna. I’d crank up my window AC unit every afternoon, thinking it was my saving grace. But then the electric bill arrived – over $300 for the month, nearly double what I’d paid the previous year. I stared at it in disbelief, wondering where I’d gone wrong. Turns out, it wasn’t just the heat; it was my neglect of the AC itself. That eye-opening bill forced me to dive deep into cleaning and maintenance, and I learned some hard lessons along the way. If you’re dealing with skyrocketing energy costs from your window AC, you’re not alone. In this guide, I’ll share seven smart lessons I picked up from my own mistakes, turning my high bills into a roadmap for keeping your unit efficient and your wallet happy. These aren’t just tips; they’re real-world insights that saved me hundreds since.
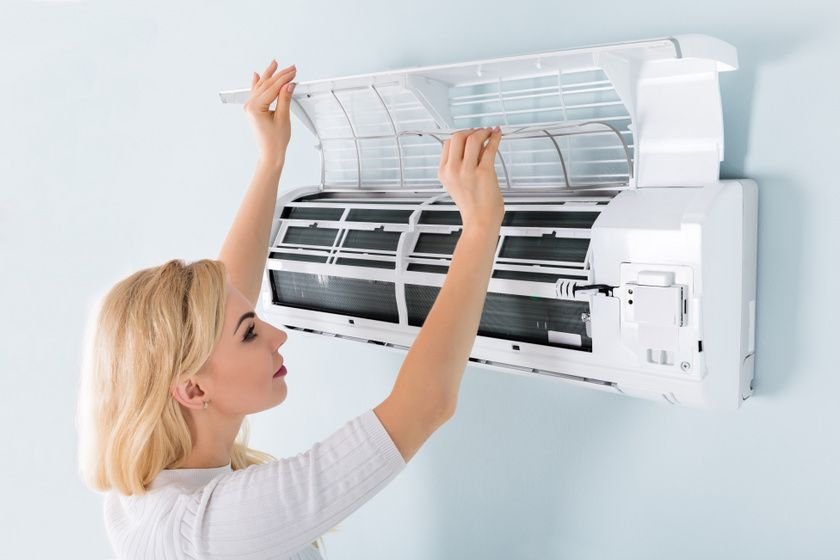
Lesson 1: Neglecting the Air Filter Is Like Throwing Money Out the Window
One of the first things I realized after that brutal bill was how a dirty air filter can sabotage your AC’s efficiency. Picture this: your filter is the gatekeeper, trapping dust, pollen, and all sorts of gunk from the air. When it’s clogged, the unit has to work overtime to push air through, guzzling more electricity. In my case, I hadn’t touched the filter in months, thinking it was fine because the AC still blew cold air. Big mistake. Experts say a dirty filter can increase energy use by up to 15%, and I felt every percent of that in my bill.
So, how do you avoid this? Start by checking your filter monthly, especially during peak usage seasons. Most window ACs have reusable foam or mesh filters that you can pull out easily. I learned to rinse mine under warm water with a bit of mild soap, letting it dry completely before popping it back in. If yours is disposable, replace it every 1-3 months – they’re cheap, around $5-10 a pop. But don’t stop there; vacuum the area around the filter housing to prevent buildup. I also started marking my calendar for filter checks, turning it into a habit. This simple step dropped my cooling costs noticeably the next month.
Beyond the basics, consider upgrading to a higher-efficiency filter if allergies are an issue in your home. Just be cautious – too thick a filter might restrict airflow even more if your unit isn’t designed for it. I tried a HEPA-style one once and noticed the AC straining, so I switched back. Another tip: if you have pets or live in a dusty area, clean more often. My cat sheds like crazy, and that fur was a silent killer for my filter. By staying on top of this, you’re not just saving money; you’re extending the life of your AC. Units with clean filters last longer because the motor isn’t overworked. Trust me, after seeing my bill halve with consistent cleaning, I treat filter maintenance like religion now.
Diving deeper, let’s talk about the science behind it. Airflow resistance increases exponentially with dirt accumulation. A study from the Department of Energy notes that restricted airflow forces the compressor to run longer cycles, spiking energy draw. In my apartment, with windows facing a busy street, dust was inevitable. I began using a soft brush to gently dislodge particles before washing, which made a difference. Also, ensure the filter is installed correctly – upside down or backward, and it’s useless. I made that error once, wondering why the room wasn’t cooling. Lesson learned: read the arrows on the filter frame.
To make this practical, here’s a quick routine: Unplug the AC, remove the front panel (usually clips or screws), slide out the filter, inspect for tears, clean or replace, and reassemble. It takes 10 minutes tops. If your model has multiple filters, like some with pre-filters, clean them all. And if you’re in a humid climate, watch for mold – a vinegar solution can help sanitize. Implementing this cut my summer bills by about 20%, proving that small actions yield big savings. Don’t wait for a high bill to teach you; start today.
Lesson 2: Dirty Coils Turn Your AC Into an Energy Hog
Coils – those finned metal parts inside your AC – were my next revelation. There are two main ones: the evaporator coil inside, which cools the air, and the condenser coil outside, which releases heat. When they’re covered in dirt, heat transfer suffers, making the system inefficient. My high bills stemmed partly from coils caked in grime from years of use without a deep clean. I thought wiping the exterior was enough, but nope – the coils need attention too.
Cleaning them isn’t as daunting as it sounds. First, unplug and remove the unit from the window if possible, or work carefully in place. For the evaporator coil, accessible behind the filter, use a no-rinse coil cleaner spray from the hardware store. Let it foam up, dissolve the dirt, and drip away. For the condenser, on the back, straighten any bent fins with a fin comb (cheap tool, worth it), then hose it down gently from the inside out to avoid pushing dirt deeper. I did this annually now, and it’s like giving the AC a fresh start.
But why do coils matter for bills? Dirty coils can reduce efficiency by 30% or more, per HVAC pros. In my experience, after cleaning, the unit cooled faster, running less overall. I also learned to keep the area around the outdoor part clear – no plants or debris blocking airflow. If you’re in a pollen-heavy area, check coils mid-season too. For stubborn grime, a soft brush helps, but avoid high-pressure water that could damage fins.
Safety first: wear gloves and eye protection, as cleaners can be harsh. If your coils are iced over – a sign of bigger issues like low refrigerant – call a pro. I ignored frost once, thinking it was normal, and it led to a repair bill on top of high energy costs. Now, I inspect coils visually every few months, shining a flashlight to spot buildup. This proactive approach has kept my AC humming efficiently.
Expanding on techniques, mix your own cleaner with water and dish soap for mild dirt, but for grease (common in kitchens), opt for commercial products. After cleaning, run the unit on fan mode to dry everything. And remember, bent fins reduce surface area for heat exchange, so straightening them boosts performance. My bills stabilized after addressing this, reinforcing that coil care is non-negotiable.
Lesson 3: Leaky Seals Are Silent Bill Inflators
Air leaks around your window AC might seem minor, but they were a major culprit in my high bills. Hot air sneaking in forces the unit to work harder to maintain cool temperatures. In my old apartment, the seals were worn, and I didn’t notice until I felt drafts. That constant battle against infiltration jacked up my energy use.
To fix this, inspect the accordion panels and weatherstripping. Replace foam strips if they’re compressed or torn – easy DIY with adhesive-backed foam from any store. I also use insulating foam panels or brackets to secure the unit better, minimizing gaps. For the window sash, add caulk or tape where needed, but ensure it’s removable for seasonal storage.
Why does this matter? Leaks can waste 20-30% of cooling energy, according to energy audits. In my case, sealing properly dropped my runtime noticeably. Test for leaks by feeling for air movement or using an incense stick – smoke wavering indicates drafts. Address them promptly.
For installation, level the unit slightly downward outside to drain condensation, but seal tightly. If your window is odd-shaped, custom foam inserts help. I learned to recheck seals after storms, as wind can dislodge them. This lesson turned my leaky setup into an airtight fortress, slashing bills.
Further, consider window insulation kits with plastic film for extra efficiency in winter storage mode. But for summer, focus on AC-specific seals. My energy savings from this were immediate, proving seals are a low-cost, high-impact fix.
Lesson 4: Oversized or Undersized Units Waste Power
Sizing matters – my AC was too small for the room, running constantly without cooling effectively, leading to high bills. The lesson? Match BTU rating to space. Too big cycles on/off too much; too small never rests.
Calculate needs: about 20 BTUs per square foot, plus factors like sun exposure. My 5,000 BTU unit for a 200 sq ft room was undersized; upgrading to 8,000 BTU helped. But don’t go overboard – efficiency drops.
Usage habits tie in: set thermostat to 78°F, use fans to circulate air. I started closing curtains during peak sun, reducing load. Timers prevent unnecessary runtime.
This adjustment cut my bills by optimizing performance. Research your model’s EER (Energy Efficiency Ratio) – higher is better. My new unit with better sizing and habits transformed costs.
Lesson 5: Poor Placement Hinders Efficiency
Where you put your AC affects everything. Mine was in a sunny window, heating up the unit. Shade it with curtains or awnings to ease the burden.
Ventilation: ensure exhaust isn’t blocked. I cleared bushes outside, improving heat dissipation. Inside, don’t block intake with furniture.
Room factors: avoid heat sources like ovens nearby. My kitchen placement was a error; moving it helped.
This repositioning lowered bills by letting the AC work smarter.
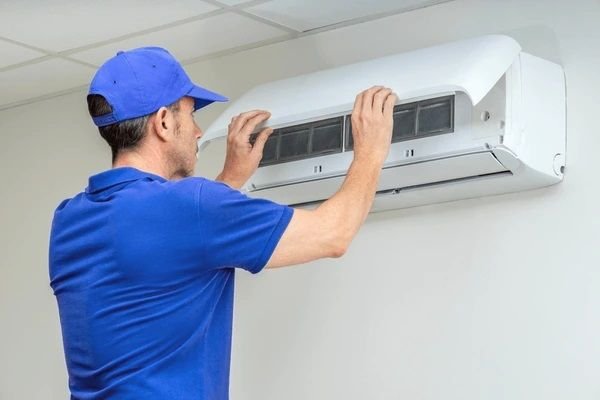
Lesson 6: Skipping Professional Tune-Ups Costs More Long-Term
I avoided pros to save money, but neglected issues compounded. Annual servicing catches problems early.
What they do: clean deeply, check refrigerant, lubricate parts. My first tune-up revealed low charge, fixing which boosted efficiency.
DIY limits: handle basics, but pros for electrics or refrigerant.
Timing: spring before summer. My bills dropped post-service.
Lesson 7: Ignoring Energy Habits Amplifies Bills
Finally, user habits. I left it on all day; now use programmable thermostats.
Other tips: clean vents, use ceiling fans, maintain humidity.
Combining with maintenance, my bills normalized.
In wrapping up, these lessons from my high bills have been game-changers. Implementing them not only saved money but made my home more comfortable. Don’t wait for a shock – apply these now for efficient cooling.