Meta Description: Window AC cleaning & maintenance guide tips that really work — Here are 5 ideas (that have saved me $$$ on electricity!) to keep your unit running great!
5 Proven Guide To Clean & Maintain Window AC That Cut Down My Bills
Last summer, one month my electricity bill came in with a number on it that made me do a double-take. I stared at it for a full minute thinking what had happened. My window AC had run all season but felt weaker than usual. The air wasn’t as cool. The unit was louder. And somehow, it was more expensive than ever.
And then I did what I should have done months earlier — actually cleaned and properly maintained it.
The difference was shocking. Within weeks, my unit was cooling better and running quieter — and my next bill was significantly lower. I didn’t buy a new AC. I did not call an expensive technician. I simply followed a regimented window AC cleaning and maintenance guide — and it made all the difference.
In this article, I’m going to share the precise 5 ideas that worked for me. Whether you’re looking to save cash, boost cooling power, or simply stretch the lifespan of your unit, we have everything you need right here.
Why A Dirty Window AC Will Cost You More
Before diving into the tips, it can be helpful to know why a neglected AC will cost you money.
If dirt, dust and debris collect in your unit, it has to work harder to force air through. Which means it takes longer for the motor to run. The compressor strains more. You burn more electricity just to get to the same temperature — or worse, it never even gets there.
Here’s a simple breakdown:
| AC Condition | Estimated Efficiency | Avg. Monthly Cost Impact |
|---|---|---|
| Clean and well-maintained | 95–100% | Baseline (lowest bills) |
| Slightly dirty (1–2 months) | 80–90% | +10–15% on bills |
| Moderately dirty (3–5 months) | 65–80% | +20–30% on bills |
| Very dirty/neglected | Below 60% | +35–50% on bills |
That last row is where I was. Is it any wonder my bill was over the top?
The good news? Most of these fixes are completely do-it-yourself friendly. Let’s get into them.
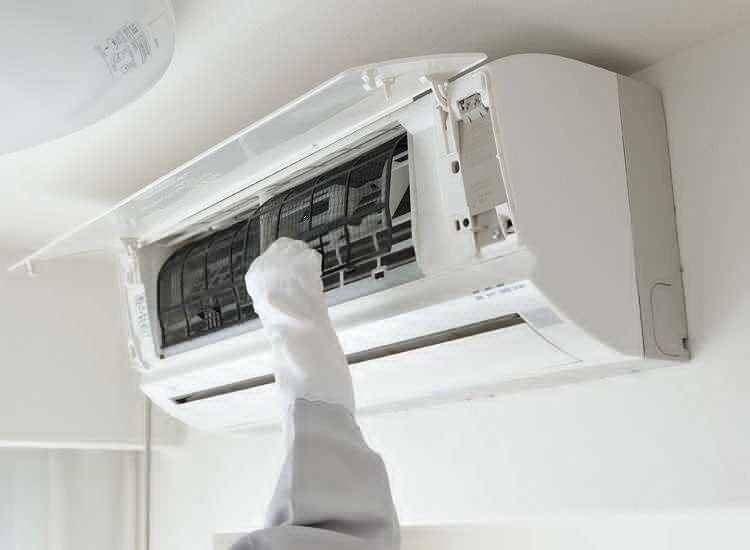
Tip #1 — Clean the Air Filter Thoroughly Every 2–4 Weeks
This is the one thing you can do that will make the biggest difference. And it is also the most underrated.
What the Filter Actually Does
The air filter in your window AC grabs dust, pet hair, pollen and other particles before they get into the system. When it gets clogged, airflow falls off a cliff. Your AC is having a hard time drawing in air, so it is running longer cycles just to cool the room.
The most common cause of efficiency loss in window AC units is a dirty filter.
How to Clean It the Right Way
Here’s how I approach it, step by step:
- Turn off and unplug the unit — always do this first.
- Pop off the front panel — it should snap or slide out.
- Remove the filter — it resembles a thin mesh screen.
- Hold it under warm running water — gentle stream, not high pressure.
- Use a mild dish soap if you see grime or grease.
- Let it air-dry completely — this is key. A wet filter can cause mold.
- Reinstall and plug back in.
That’s it. Takes about 10 minutes.
How Often Should You Do This?
- Every 2 weeks during peak summer use
- Every 4 weeks with lighter use
- Never skip more than a month during active cooling season
Depending on the type of filter, some are reusable while others must be changed. Check your manual. If yours is the kind that can be swapped out, you can get a fresh filter for just a few dollars — and it’s well worth it.
Tip #2 — Clean the Evaporator and Condenser Coils Once Per Season
Most folks have never even heard of these. But coil cleaning has been one of the biggest changes for my bills.
What Are These Coils?
Your window AC has two sets of coils:
- Evaporator coils — on the indoor side, they pull heat out of your room
- Condenser coils — on the outdoor side, they reject that heat outside
Dust and dirt on these coils hinder efficient heat transfer. That means the unit has to work a lot longer to accomplish the same task.
Signs Your Coils Need Cleaning
- The AC runs but the room stays hot
- Ice build-up on the indoor unit
- The unit runs for very long cycles
- Higher electricity bills without any change in usage
How to Clean the Coils at Home
You’ll need:
- A soft brush or old toothbrush
- Coil cleaning spray (available at hardware stores for about $10)
- A fin comb (optional but useful)
- A dry cloth
Steps:
- Unplug the unit completely.
- Remove the outer casing — you may need a screwdriver.
- Using the soft brush, carefully dust away loose debris from each set of coils.
- Spray the coil cleaner on the coils and allow it to foam up — it will lift dirt without scrubbing.
- Gently wipe away any residue with a cloth.
- Let everything dry before reassembling.
Do this once early in the season and once at the season’s end before putting it away. That’s two cleanings a year — and they make all the difference. For more seasonal maintenance tips, visit Window AC Maintenance — a great resource for keeping your unit in top shape year-round.
Idea #3 — Clean the Drain Pan and Drain Line Regularly
This one totally blindsided me. Until I woke up to water dripping into my room, I was not aware that my AC even had a drain pan.
Why Drainage Matters for Efficiency
Your AC cools the air, but it also removes humidity. That moisture then drips into a drain pan and drains out through a small drain line. If that line becomes clogged — with algae, mold or dirt — water backs up. The unit runs more, humidity stays elevated and the room never reaches a state of true comfort.
A blocked drain will also cause water damage, mold, and strange musty smells.
How to Clean the Drain Pan
- Unplug the unit.
- Disassemble the casing to get at the drain pan.
- Wipe away any standing water with a wet cloth or sponge.
- Add about ¼ cup of white vinegar to the pan. This kills algae and mold.
- If you see a drain hole, clear it with a small brush or pipe cleaner.
- Wipe dry and reassemble.
Repeat every 4 to 6 weeks throughout the cooling season. Less than 10 minutes and saves a world of trouble.
What Happens If You Skip This?
| Time Elapsed | Consequence |
|---|---|
| 1–2 months | Mild musty smell, slight humidity issue |
| 3–4 months | Mold growth in pan, reduced cooling |
| 5+ months | Water damage, potential unit failure, possible health risks |
Don’t allow it to reach that third row.
Idea #4 — Inspect and Seal the Window Installation Gap
Here’s something most guides don’t even touch on — but it got me one of the biggest bill reductions out of all five ideas listed.
The Hidden Energy Leak You’re Ignoring
There’s always a gap between the window AC and the window frame when you install a window AC. When that gap isn’t sealed well, hot outside air seeps in all the time. Your AC is trying to cool the room while warm air sneaks in from all sides.
It’s like trying to pour water into a bucket with a hole in it.
According to the U.S. Department of Energy, sealing and insulating around your cooling equipment is one of the most effective steps you can take to reduce energy costs at home.
How to Check for Gaps
On a hot day, place your hand around the perimeter of the AC unit. Check for any warmth coming in from outside. You can also use a candle or stick of incense — if the smoke moves toward the unit or flickers near the edges, air is leaking in.
How to Seal It Properly
- Foam weatherstripping — peel-and-stick strips that fill gaps along the top and sides. Very cheap.
- Foam insulation panels — trimmed to fit over the accordion side panels of the AC. A whole lot better than the flimsy plastic ones they come with.
- Caulk or rope caulk — for any permanent gaps around the window frame itself.
A complete sealing job costs less than $15 in materials and takes about 30 minutes. The payoff is immediate — less hot air in means the AC gets to the target temperature faster and shuts off sooner.
Before and After Sealing — My Experience
My AC was running for almost the entire period of peak afternoon hours before sealing. After sealing every gap with foam strips and replacing the side panels with proper insulation foam, it started cycling on and off without any trouble. That alone cut about 20–25% off my runtime.
Idea #5 — Set Up a Smart Thermostat Routine and Use the Right Fan Speed
This final idea is less about physical cleaning and more about how you use your AC. But it remains part of a full window AC cleaning and maintenance guide — because habits are just as important as hardware.
Stop Blasting Your AC All Day Long
Most people do one of two things — they leave the AC on at max all day, or they crank it to the coldest setting hoping the room cools down faster. Both habits waste money.
Here’s the truth: setting the temperature lower doesn’t cool the room faster. Your AC cools at the same rate regardless of what temperature you set. Setting it to 60°F when you want 72°F just means it overshoots and wastes energy.
The Smart Routine That Worked for Me
| Time of Day | Action | Reason |
|---|---|---|
| Morning (before leaving) | Set to 78°F or turn off | Avoid cooling empty rooms |
| 30 min before arriving home | Turn on to 74°F | Pre-cool without waste |
| Evening (sleeping) | Set to 72–74°F | Comfortable without overcooling |
| Night (cool outside) | Use fan-only mode | Free cooling from outdoors |
A simple plug-in smart outlet with a timer (about $15–20) can automate this even on a basic window AC that doesn’t have any smart features.
Use the Right Fan Speed
- High fan speed — use when the room needs fast initial cooling
- Medium fan speed — use for maintenance cooling once the room is comfortable
- Low fan speed — use at night for quiet, efficient operation
Running on medium or low once the room has reached temperature uses less electricity than staying on high the entire time.
Keep the AC Away From Heat Sources
If your window AC is near a lamp, television, or gets direct sunlight all day, it works harder than it needs to. Use blackout curtains on windows near the unit. Move heat-generating appliances away. Small changes like this lower your AC’s load significantly.
Full Maintenance Schedule — At a Glance
Here’s a quick reference table to keep everything organized:
| Task | Frequency | Time Required | Cost |
|---|---|---|---|
| Clean air filter | Every 2–4 weeks | 10 minutes | Free (or $3–$5 for replacement) |
| Clean evaporator/condenser coils | Start and end of season | 20–30 minutes | $8–$12 for spray |
| Clear drain pan and drain line | Every 4–6 weeks | 10 minutes | Free (use vinegar) |
| Seal installation gaps | Once per season (check) | 30 minutes | $10–$15 one-time |
| Optimize usage habits and settings | Ongoing | N/A | $0–$20 for timer plug |
If you stick to this schedule, you’re doing more than 90% of window AC owners ever do.

How Much Money Can You Actually Save?
Let me throw some ballpark numbers on this. These figures are based on a typical 5,000–8,000 BTU window AC running in a warm climate.
Estimated Annual Savings From Each Maintenance Step:
- Cleaning the filter regularly: $15–$40/year
- Cleaning the coils: $20–$50/year
- Clearing the drain and maintenance: $10–$25/year
- Sealing installation gaps: $25–$60/year
- Smart usage habits: $30–$80/year
Total estimated savings: $100–$255 per year simply from consistent maintenance on a single window unit.
If you have more than one unit, multiply that. That doesn’t even factor in the money saved by prolonging the life of your AC — preventing that $300–$600 replacement purchase for another 2–4 years is enormous.
Quick Tips to Keep Your AC Running Strong All Season
- Never block the vents — furniture or curtains in front of the unit reduce airflow and efficiency
- Check the fins on the coils — if they’re bent, straighten them with a fin comb
- Listen for unusual sounds — rattling or grinding typically indicates a loose part or debris inside
- Check the power cord for any cracks or fraying before the start of the season
- Store the unit properly in winter — cover it or take it out of the window to avoid damage and drafts
Frequently Asked Questions About Window AC Cleaning and Maintenance
Q: How often do I need to give my window AC unit a full cleaning? A full cleaning — coils, drain pan and filter — should be done at the beginning and end of each cooling season. During use, the filter must be cleaned every 2 to 4 weeks.
Q: Can I clean my window AC without removing it from the window? You don’t need to pull the unit out for most routine maintenance tasks like cleaning the filter, wiping down the outside, and clearing the drain pan. Coil cleaning is easier with the unit out, though it can sometimes be done in place with the right spray.
Q: What would happen if I never clean my window AC? Efficiency drops significantly. Expect higher electricity bills, weaker cooling performance, more frequent breakdowns, mold growth, bad smells, and an overall shorter lifespan for the unit.
Q: Is it safe to use water to clean the inside of a window AC? Use water carefully. Rinsing the filter is fine. Do not spray water directly on electrical components. Make sure everything is completely dry before plugging the unit back in.
Q: How can I tell when my AC needs professional servicing instead of DIY cleaning? If the unit is freezing up repeatedly, making grinding or loud mechanical noises, leaking refrigerant (hissing sound or ice forming on the lines), or simply not cooling at all despite being clean — it’s time to call a technician.
Q: Does cleaning the AC really lower electricity bills? Yes — multiple studies and real-world users confirm that a clean, well-maintained AC uses 15–40% less electricity than a dirty, neglected one. It’s one of the most cost-effective home efficiency improvements you can make.
Q: What cleaning products should I avoid using on my AC? Steer clear of harsh chemical cleaners, bleach (unless very diluted and only for mold), and high-pressure water. These can damage coil fins, erode metal parts, or strip protective coatings.
Wrapping It All Up
A window AC cleaning and maintenance guide is not just a checklist — it’s a money-saving habit that pays off every single month.
These five ideas are not rocket science. They don’t take special skills or costly tools. But they do require consistency. You’ll see results if you clean the filter regularly, take care of the coils, keep the drain clear, seal those sneaky air gaps, and use your AC smartly.
Instead of dreading my electricity bill every month, I now actually feel good about how efficiently my home is running. You can do the same thing.
Start with the filter this week. Then work your way through the list. When peak cooling season arrives, your AC will be prepared — and so will your wallet.